
Whether you’re a seasoned pro, a new user, or just someone interested in what Municity 5 has to offer, these Tips are for you!
This month, we will be focused on
Checking/Managing License Records on Contacts!

The Municity 5 suite of tools offer multiple ways to manage your day-to-day, which at times can be a lot to keep track of. Luckily, Muncity 5 has many built-in options to help you, even down to the managing various Licenses on a contact or company record.
Today, we will covering just that, how to view/manage Licenses!

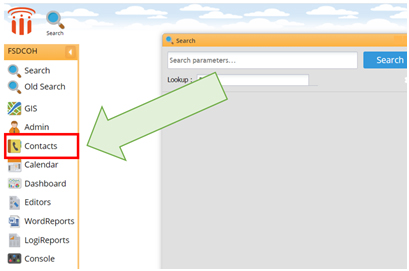
Log in to your Municity homepage and navigate to the dock on the left side of the screen. Click on the tab for “Contacts” to open the contacts screen.

This will bring up the “Contacts” database, which houses all of your contacts within your Municity 5 site.
From here, you can search for any person or company in the system. If the person or company cannot be found you can also create them from here.

The quickest and simplest way to check licenses is utilizing the search box to type in a contact or company, then click the “Check Licenses” option box located next to the “Contact Type” dropdown.
Selecting this checkbox will filter your results, color-coding the text on active license in green and inactive/expired licenses having text in red. To view status and license type information, simply click the small “+” button on the result line to expand this information (pictured above).
Additionally, if there is a Workman Comp & Liability Insurance associated, the whole result line will be highlighted based on status –green for active, and red for inactive/expired (see images below for example).


If you would like to see a more detailed view of licensing information, you can also view directly on the contact record. Using the step from #2, search for the name of the individual you are looking for, and press the search button on the right side of the window.

Once you hit the search button, your record results will be listed underneath the columns fields.
To open the desired contact record, simply click the record.

Once you click and open the contact record, you will be able to view the associated information.
The overview is the first screen, giving basic information such as address, email, etc.
To access additional information related to the contact record, navigate to the tabs on the left-hand side of the window (highlighted in red above).

To view specific licenses associated with a contact, navigate to “Items” from the previously mentioned tabs. Then select “Licenses” from the Items menu.
This will list all of the licenses the contact has in the system, and can be sorted by the various columns.
To view more information of a specific license, or perform tasks such as renewals/add fees/etc., click the desired license record to open it.

License Records follow similar scheme to the contact record, where the overview information is listed first, and all other associated items (fees, etc.), are listed under the “Items” tab on the left-hand menu.
For quick renewals, you may also select the “Renew License” button in the top right corner of the window.

After opening “Items,” you can perform the further tasks listed above, and more!
(see image above to view renewals example, and image below to view adding of fees example)

And there you have it!
You’ve successfully Checked Licenses within Municity.